Thursday, June 30, 2011

Blueberry Lemon Coffee Cake (Low-Fat)

I love love love this coffee cake. As does my family.


Combined, these are the reasons why it is almost gone. One day after it's birth. It is moist and fluffy and light and completely and utterly out of this world divine. Dee-vine. Really. It has a distinct almond flavor thanks to the addition of almond paste. I love this about it. And almonds aren't even my favorite nut! I would only eat them for a snack if they were to be covered in that artificial powder labeled as "smokehouse flavor" or "lime and chili". Disgusted yet? But wait, you haven't even gotten to the recipe! And I don't like the wasabi flavor. So ha, I do have a redeeming quality. Remember, if you don't like almonds, don't skimp on the paste! It is a must. I am begging you. And I may or may not have eaten spoonfuls of it while "cleaning up".
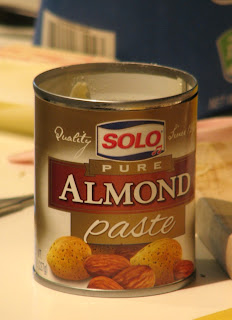
We ran to the grocery store just to get this. Totally worth it!

Blueberry Lemon Coffee Cake (adapted slightly, and I mean slightly, from this link)

Ingredients
Cake:
1.5 cups all-purpose flour
2 teaspoons baking powder
1/4 teaspoon baking soda
1/2 teaspoon salt
1/2 cup sugar
1/3 cup almond paste
2 tablespoons chilled butter, cut up into small pieces
1 large egg
1 tablespoon lemon juice
3/4 cup milk
1.5 cups blueberries
2 teaspoons lemon rind
Topping:
1/4 cup sugar
1.5 tablespoons melted butter
1.5 teaspoons cinnamon


Directions
Preheat the oven to 350 degrees, and grease a 9 inch pan.
Cake: Mix the first four ingredients in a small bowl. Beat the sugar, almond paste, and butter with a mixer until  it is well blended. Add in the egg and lemon juice, beating well. Beat in the flour mixture and milk, beginning and ending with the flour mixture. Fold in the lemon rinds and blueberries. Pour the mixture into the prepared pan.
Topping: Combine all of the topping ingredients in a small bowl and sprinkle over the top of the cake.
Bake for 35 minutes and then cool in the pan. Enjoy!

It looks a little funky with the topping before baking, but it is lovely afterwards!

*Note: If you are using the same lemon for the rind and juice, zest first and then juice! This may seem like common sense, but I completely spaced out and it was near impossible to draw zest from a slippery, sliced lemon!
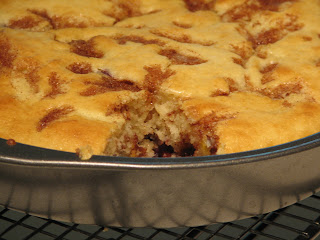
Pieces this small have negative calories, so eat up!


Tuesday, June 28, 2011

Coconut Lime Banana Bread (Low-Fat!)

I really have no words. Except for maybe "yum". And "my stomach hurts from eating so much". But otherwise, that's about it. This bread is delicious and summery and moist and amazing, without and oil or butter.


The little coconut flakes add an interesting texture without being overpowering and the hint of lime adds an amazing tropical punch. Please, please make this. Really. It will transport you immediately to a sandy white Caribbean beach with a tanned cabana boy serving you a piƱa colada in a coconut shell. I promise.


Coconut Lime Banana Bread (adapted from this and inspired by this)

Ingredients

  • 2 large eggs

  • 3/4 cup sugar

  • 3 medium bananas; smashed

  • 1/3 cup buttermilk*

  • 1 tablespoon applesauce

  • 1 tablespoon vanilla extract

  • 1 3/4 cups all purpose flour

  • 2 teaspoons baking powder

  • 1/2 teaspoon baking soda

  • 1/2 teaspoon salt

  • 1/2 cup shredded coconut

  • zest from 2 limes

  • *No buttermilk? No problem! Add two tablespoons of white vinegar to 3/4 cup of milk. 


    Directions
    Preheat your oven to 325 degrees and grease a 8.5 x 4.5 x 2.5-inch pan, then dust with flour. Beat the eggs and sugar in a large bowl for 5 minutes or until thick and light. Mix in the smashed bananas, buttermilk, applesauce, and vanilla extract. Then sift the flour, baking powder, baking soda, and salt into the bowl. Add the coconut flakes and zest and mix until just combined. Pour the mixture into the prepared pan and bake for about one hour, or until a toothpick inserted in the middle comes out clean (the top of the bread should be golden brown). Flip outside of the pan and enjoy! 

    Thursday, June 23, 2011

    Mysteries

    I am having some troubles today. Number one. Why can't I get my pictures to stand vertically?


    Every time I rotate them they rotate back after I upload them! Grr. Technology.

    Also, why are all the corn bread muffins I make so bland? I love corn and I love bread so why can't they just mold themselves together magically to form a moist, tender, flavorful burst of wonderfulness? Why?

    Third. Who wants to do dishes? :)


    But seriously. Corn bread suggestions?

    The Distinguished and Exclusive Pumpkin Muffin (Low-Fat)

    Not going to lie. The original title for this post/recipe was Single Pumpkin Muffin. But that just sounds so blah, no? Why would you have a single pumpkin muffin when you can have an exclusive or distinguished pumpkin muffin? See? Thank you, Thesaurus.com. This muffin is so simple. Really. You don't even need to get out your beater or blender or whisk or mortar and pestle! All you need is a fork, your measuring spoons, and two bowls. Not even big bowls. Tiny bowls! Like this:


    Okay maybe not that small, but small. I used cereal bowls. And I know, I know, more pumpkin. Maybe it's because it's almost July and it's still 52 degrees outside which means it's the sort of weather where you should be crunching through multicolored leaves and breathing in crisp air scented with apple cider and other fall things that I can't think of, and...ugh. Whatever. I just love pumpkin. 


    These muffins are awesome. They are sugar and spice and everything nice. They are filled with gooey chocolate and topped with a crispy sprinkling of coarse sugar. And best of all, they are the definition of portion control. One batch equals one muffin. Easy peasy. 

    The Distinguished and Exclusive Pumpkin Muffin 
    (inspired by the One Bowl Vanilla Cupcakes from the incredibly genius blog, How Sweet It Is, and adapted from this delicious pumpkin muffin recipe).


    Ingredients
    1 tablespoon sugar
    1 teaspoon oil
    1/8 egg (I just estimated for this. Try cracking an egg and then scooping some out with a spoon.)
    1 tablespoon canned pumpkin
    1 teaspoon water
    2 tablespoons flour
    1/8 slightly heaping teaspoon baking powder
    1/8 slightly heaping teaspoon baking soda
    1/4 teaspoon cinnamon
    1/8 teaspoon salt
    2 heaping teaspoons chocolate chips
    1 teaspoon turbinado sugar

    Directions
    1. Heat the oven to 400 degrees and set up your muffin tins with either muffin cups or by greasing thoroughly. 
    2. Mix the sugar, oil, and eggs together in a small bowl and add the pumpkin and water. In a separate bowl, mix together the dry ingredients. Pour the pumpkin mixture into the dry ingredients and mix. Stir in your chocolate chips. 
    3. Pour the batter into the prepared muffin tin. Sprinkle the muffin with turbinado sugar and bake for 10-12 minutes. Enjoy!

    Tuesday, June 21, 2011

    Happiness Is...

    ...A giant stack of freshly baked cookies. 

    Pumpkin Pancakes (Low-Fat)

    As you may be able to tell, I have a thing for pancakes. What you may not know, however, is that I am a little bit obsessed with pumpkin. Okay, I lied. I am REALLY obsessed with pumpkin. I love it. Cannot get enough. Give me pumpkin muffins, bars, breads, whatever. Make it pumpkin and I am happy. These pumpkin pancakes are not to dissapoint. They are moist and fluffy, like little clouds of pumpkin pie.

    Pumpkin Pancakes (adapted from Tasty Kitchen)
    *This version only makes two servings!*

    Ingredients
    1 cup All-Purpose flour
    1 1/2 teaspoons baking powder
    1/4 teaspoon salt
    1 teaspoon cinnamon
    3/4 cup milk
    1/4 cups pumpkin
    1 egg
    2 1/4 teaspoon applesauce
    chocolate chips

    Directions
    In a large bowl, mix the dry ingredients. In a smaller, separate bowl, mix the remaining ingredients. Pour the mixture of the small bowl into the large bowl and whisk until just combined. Pour dollops onto a hot nonstick pan and put on desired amount of chocolate chips. Flip when bubbles form. Cook for a few more moments on the other side and serve!

    The tester pancake :)

    Put on your chocolate chips! I like a lot of them :)

    Flip!

    Top with bananas and syrup and enjoy!


    Nectarine Galette (Low-Fat)

    Ah, summer. You bring us sunny days, itchy mosquito bites, and buckets of juicy, juicy fruit. Like, a lot of fruit. An apple a day? More like twenty. But that's okay. Because I like fruit. Love it, even. Maybe this love of mine has something to do with being able to turn this fruit into a warm, gooey tart or crisp or cobbler, maybe not. But maybe. This galette is a must for summer. Use nectarines or peaches or plums or a combo of all three! Heck, use chocolate if you can! Then give some to me.

    Nectarine Galette (adapted from the July 2011 issue of Real Simple magazine)


    Ingredients
    1 refrigerated pie crust
    3 thinly sliced nectarines (or plums or peaches. Or chocolate. Heehee.)
    2 tablespoons sugar
    2 teaspoons cinnamon
    1/2 teaspoon cut up butter
    2 teaspoons water
    1 tablespoon sugar


    Directions
    Heat the oven to 375 degrees with the rack in the lowest position. Place the pie crust on a parchment lined baking sheet. Leave a 2-inch border on the pie crust, and top with fruit slices. Mix together 2 tablespoons sugar and 2 teaspoons cinnamon and sprinkle on top with cubed butter. Fold the edges of the dough toward the center having it overlap the fruit a little bit. Brush the edges of the pie crust with 2 teaspoons water and sprinkle 1 tablespoon of sugar over the crust. Bake 35 to 40 minutes or until the crust is golden-brown and the juices of the fruit are bubbling. Enjoy!

    Saturday, June 18, 2011

    Mango Salsa

    This title is a bit deceiving, because not only is this salsa stuffed with juicy mangoes (whenever I hear that phrase I always think of this movie), but it is also filled with plump kiwis and fresh cantaloupe. Can you tell that I am going a wee bit adjective-crazy today? Anyways, this salsa was delicious. Not spicy, but fresh and cool. Just how a summer dish should be. It could also pretty much complement anything you pair it with. We had it with soft-shell tacos, but I am drooling imagining it glistening over fresh fish or simply enjoyed with chips (we actually did try the latter. I was right. It was rather drool-worthy).

    Hmm. I don't know why this came out vertically!
    Mango Salsa


    Ingredients
    1 mango, cubed
    1 kiwi, cubed
    1/2 cup cantaloupe, cubed
    4 mint leaves
    zest of one orange, lime, or lemon
    2 tablespoons fresh lime juice

    Directions
    Mix everything, and serve it quickly!

    Basically all you need to do is add everything to this!

    Note: When I made this we were low on ingredients slash overall food, otherwise I would have recommended adding some red bell peppers, red onion, and basil or cilantro. Do this and tell me how it is! Or better yet, send me a taste!

    Wednesday, June 15, 2011

    Blueberry Lemon Buttermilk Pancakes (Low-Fat)

    Blueberry Lemon Buttermilk Pancakes. Try saying that one three times fast. These are delicious. And they have fruit in them. In fact, the title alone has TWO fruits in it! Wow. That is pretty much the definition of healthy. So go ahead, eat the entire batch and cross off all of your daily dietary needs, because darling, you just met them! Also, no butter! Or oil! WHAT?!, you may ask. I will tell you what. I must be going crazy. Because everything needs butter. At least that is what I thought previously before discovering these magical pancakes. These babies need no butter. They have applesauce instead. AHA! A third fruit! No you have no excuses to NOT make them. 

    Blueberry Lemon Buttermilk Pancakes (slightly modified from this Fluffy Pancakes link)

    Ingredients
    3/4 cup milk
    2 tablespoons white vinegar or lemon juice
    1 cup all-purpose flour
    2 tablespoons white sugar
    1 teaspoon baking powder
    1/2 teaspoon baking soda
    1/2 teaspoon salt
    1 egg
    2 tablespoons applesauce
    zest from one lemon
    3/4 cup fresh blueberries

    Directions:
    1. Combine milk with vinegar or lemon juice in a medium bowl and set aside for 5 minutes to "sour".
    2. Combine flour, sugar, baking powder, baking soda, and salt in a large mixing bowl. Whisk egg and applesauce into "soured" milk. Pour the flour mixture into the wet ingredients and whisk until lumps are gone. Fold in lemon zest and blueberries. 
    3. Heat a large skillet over medium heat, and coat with cooking spray. Pour 1/4 cupfuls of batter onto the skillet, and cook until bubbles appear on the surface. Flip with a spatula, and cook until browned on the other side.


      *Note: You can omit the lemon zest and blueberries and instead add 1/2 cup chocolate chips for an equally delicious pancake!


                    Whisk together all of the dry ingredients


                    Add the wet ingredients. Except don't be lazy like me and dump them directly into the dry ones! Or do. Whatever. It all works out in the end!


                    Now comes the hard part. Find your zester. It took me approximately 72 million hours to find mine. I doubt it had anything to do with this vision of cleanliness. 


                    The end result. I suspect these would be delicious stuffed between layers of lemon curd and whipped cream.


                    Now I don't want to sound cocky here people, but I have made billions of pancakes in my life time. Probably quintillions. More than the Employee of the Month at IHop. And NONE compare to these babies. MAKE THEM. 

                    Tuesday, June 14, 2011

                    I am Such a Bad Food Blogger...

                    Okay, so here's the thing. I'm not a very good food blogger. You see, I made this AMAZING apple cake yesterday from Tracey's Culinary Adventures. And it was good. Like, too good to let sit and take pictures of. So unfortunately, I have no pictures of it to share with you, although you can see some from Tracy's blog herehere, and here. So just trust me on this one. It was life-changing. You need proof? There was no trace of it within 24 hours after baking so unfortunately, I have none to offer. Hmm. I wonder where it went. Maybe I should ask my bulging stomach? Anywho, I was partially lying about the photos. I did take one picture during the process, but when I went to upload it, I found that it got deleted (why yes, I AM very technically savvy!). But I wish I could have shown it to you! I do believe it might have triggered a giggle or two. You see, I was sort of trying to take a nice action picture. You know, that effortless shot of liquid or batter being carefully caressed into a heaping bowl of chocolate batter. Or cookie dough batter. Whatever, I'm easy. Anyways, I guess I was so focused on taking the picture that I didn't really realize that I had COMPLETELY missed the bowl and was pouring milk all over the counter. Fortunately, nobody was wounded except for a soaked apple who was later chopped up so it didn't really matter anyways. But it was supposed to look like this. Or this. Whatevs. It only wasted like eleven paper towels.

                    Sunday, June 12, 2011

                    The Aftermath

                    This is what happened to those muffins that I made yesterday. Yes, yesterday. Yes, I did make ten of them. I am really good at self-control. Please save me.


                    But it looks so lonely. I think it needs some friends. I think I need to go whip up fifteen more. Then throw them a party. In my belly? Sorry. That was really weird. But seriously.

                    Saturday, June 11, 2011

                    Photography

                    Photography. Tough stuff. Why does everybody have to make it look so easy?! AGH. This afternoon, as I was casually dwindling my summer away on Pinterest (DO NOT visit this site. It is deadly. You will not be able to go outside and get your vitamin D. You will be stuck in a coma in front of your computer. I warned you.), I stumbled upon a lovely link promising to give you steps on how to perfectly light your photos. The directions were awesome, and it had great ideas. Basically you set up a little station by a window and get silly with tin foil.

                    You can check it out here: http://www.handmadespark.com/blog/studio-quality-product-photography-with-a-12-set-up-guest-post-from-via-u-photography-blog/

                    But soon after I began shooting (I am using an old Canon PowerShot S2 IS), I became excruciatingly aware of how terrible I really am at photography. My two main problems were this (and please excuse my ranting and abundant use of parenthesis): If I positioned myself close to the object and then zoomed in a bit, the lighting was great. Glowy and ethereal. Perfect. The problem with this, however, was that the picture was super blurry and you could barely make out what I was shooting! Problem number two was basically the same thing. If I sat farther away and THEN zoomed in the picture was clearer but the lighting was bleah. Sigh. Here are a few examples:

                    First up is the lemon photo-shoot! This was my fist try, so bear with me please!


                    See? Icky lighting but clear image. I like the blurry-ish background here, though.

                    Muffin photo-shoot:


                    This one has no flash and it looks so blurry and bleak. It even makes ME a bit sad looking at it!


                    This one has flash and I like it a bit better. You can see the crumbs on the muffin top. 


                    This is one of my favorites. The lighting is awesome but the image is still not the best. 


                    In this one I believe I used flash, which somehow made the background green? Hmm :)

                    Here's a little sample of what the set-up looked like:


                    Apple photo-shoot:

                    Here the lighting was great but the image was so blurry! GAH. 


                    Then if I backed up and zoomed in the sharpness was back but the lighting was stinky:


                    Oh well! Food is meant to be eaten anyways!

                    On a random note I saw a tick in my bathroom. EW. I hope the neighbors don't mind me rushing into their house at night to use their restroom, because I'm not going in there again :)

                    Banana Crumb Muffins (Low-Fat)

                    Hello everybody! As my first blog post, I wish I could tell you that I have created some kind of genius creation; something visually stunning. A knockout masterpiece. Chocolate mousse perhaps? Also, please don't bother telling me that chocolate mousse isn't really "a genius creation." I live in Minnesota. Here, hot dishes and Dairy Queen ice cream cake are considered fine delicacies. Anywho, genius creations weren't really an option this morning. No particular reason why, I was just feeling a wee bit lazy.

                    And I was craving bananas.

                    And try as I might, I just could not get my bananas to knock me out with their beauty. Maybe it was because
                    they were so brown and bruised or maybe it was because they were just bananas. But bruised bananas and
                    muffins?

                    They make a lovely couple.

                    Banana Crumb Muffins (adapted ever so slightly from this link: http://allrecipes.com/Recipe/banana-crumb-muffins/Detail.aspx)

                    Ingredients:
                    1 1/2 cups all-purpose flour
                    1 teaspoon baking soda
                    1 heaping teaspoon baking powder
                    1/2 teaspoon salt
                    3 bananas, mashed and ripe
                    1 egg, lightly beaten
                    1/3 cup applesauce (here you can also use melted butter, but applesauce turned out just fine!)
                    1/3 cup packed brown sugar
                    2 tablespoons all-purpose flour
                    1/8 teaspoon ground cinnamon
                    1/4 teaspoon butter

                    Directions:
                    1. Preheat oven to 375 and lightly grease 10 muffins cups or line them with muffin papers.
                    2. In a large bowl, mix together 1 1/2 cups flour, baking soda, baking powder and salt. In another bowl, beat together bananas, sugar, egg and applesauce. Stir the banana mixture into the flour mixture just until moistened. Spoon batter into prepared muffin cups.
                    3. In a small bowl, mix together brown sugar, 2 tablespoons flour and cinnamon. Cut in 1 butter until mixture resembles coarse cornmeal. Sprinkle topping over muffins generously.
                    4. Bake in preheated oven for 18 to 20 minutes, or until toothpick inserted into center of a muffins comes out clean. 

                    These are ah-mayzing. I am drowning in muffins. They are up to my thighs. Or rather, in them. 


                    Also, sorry about this awkward bunch of pictures. I am not exactly the most technically savvy, so please bear with me as I learn to do this!

                    Note: I added chocolate chips to my muffins and it was pure heaven. Please do this too.